More Categories

Business Hours

Random Posts

Wednesday, December 31, 2014

2014 HERE WE ARE TO GIVE THANKS TO GOD

- No comments

Happy new year to all www.funnydpix.cf fans

Happy New Year To You All

- No comments

HAPPY NEW YEAR TO YOU ALL, AM HAPPY TO SEE THESE NEW YEAR 2015

Sunday, December 28, 2014

2015 Here I Come

- No comments

2015 here i come, better thinqz ahead of me....

Saturday, December 27, 2014

Sh0ki

- No comments

Taught of drawinq these just came to my mind..

Thursday, December 25, 2014

Oluwa Don Bless Me, Haterz Oya Die Put

- No comments

Contact www.funnydpix.cf owner for all type of graphic work @ cheap rate...on whatsapp with 08068688739

Tuesday, December 16, 2014

Step By Step How To Make The Photo-to-cartoon Effect

- No comments

Step by step how to make the photo-to-cartoon effect 01 Convert to sketch Open your start image. Hit Cmd/Ctrl+J to duplicate the background layer, then Cmd/Ctrl+ Shift+U to remove colour. Hit Cmd/Ctrl+J again, then Cmd/Ctrl+I to invert the tones. Change the Blend Mode to Color Dodge. Go to Filter>Blur> Gaussian Blur. Set Radius to 8px and hit OK. 02 Make lines stronger Hit Cmd/Ctrl+Shift+Alt+E to merge a new layer, then Cmd/Ctrl+J to copy it. Set the Blend Mode to Multiply, then copy the layer three times to make the lines stronger. Highlight the top layer, Shift+click the layer above the background and hit Cmd/Ctrl+E to merge. Rename the layer Sketch. 03 Clean it up Make a new layer, drag it below the sketch layer, then go to Edit>Fill Layer. Set Use: White and hit OK. Next highlight the sketch layer and click the Add Layer Mask icon in the Layers Panel. Grab the Brush tool and set colour to black, then paint to tidy up the skin, clothes and hair. 04 Paint in colours Change the Blend Mode of the sketch layer to Multiply, then make a new layer and drag it below. Grab the Brush tool and choose a colour for the skin, then begin painting. Make more new layers and paint different colours for the hair, eyes, mouth and jeans. 05 Reveal the tattoos Duplicate the background layer. Drag it to below the sketch layer. Go to Filter>Brush Strokes>Ink Outlines. Leave the default settings and hit OK. Alt-click the Add Layer Mask icon to add a mask that hides the layer, then paint with white to reveal the tattoos. Next highlight the white layer. 06 Add background effects Go to Filter>Texturiser>Grain. Set Grain Type: Vertical, Intensity 100, Contrast 0. Go to Filter> Blur>Gaussian Blur. Set Radius 4px. Go to Filter> Distort> Polar Coordinates and pick Rectangular to Polar. Hit Cmd/Ctrl+U, check Colorize, set Hue 211. Paint white over any lines that show through. Final Tip When colouring in different parts of an image, always use a separate layer for each colour so you can erase, tone down or change the shade at any time.

Police Is Your Friend

- No comments

Naija police fear pass die || Contact www.funnydpix.cf owner for all type of graphic work @ cheap rate... || http://funnydpix.cf/site_13.xhtml?get-file=29

HOW TO ANIMATE AN IMAGE USING PHOTOSHOP

- 1 comment

An image animation in Photoshop CS6 or lower versions takes patience and professionalism. But, this post contains logical procedures with understandable illustrations to pick you from the amateur level or intermediate level to the advanced level of image animation. NOTE: This tutorial takes hours to do a good job...If you want a tutorial that just applies couple of filters then this post isnt for you. Resource image: Step 1:Open Photoshop CS6 or any lower version. Open a new file, File > New > Width and Height should be square (that is, of the same proportion) if you are designing for a display picture or social app. But if its just for web, you can make it any size you want. Step 2: We alreadily have an existing white background. Then, create a new layer... Layer >> New >> Layer>>OK. or click on the new layer icon at the layers window as it is in the below image. Step 3: Click on File >> Place>> Source for an image you want to animate >> PLACE. Your image will authomatically be visualised above the white background. Step 4:Rasterise the image, there are various ways to rasterise an object. A layer is been rasterised so as to make it accessable for edition. Right click on the layer which contain the image and selectRasterise. Step 5: The lady on my image opened her eyes and this tutorial is to animate her to make her blink her eyes. The next step, duplicate the rasterised layer. To do that, right click on the layer with the image and press Ctrl + J to duplicate the original image. Step 6: Select the Clone Stamp tool on the tool box. It is a very useful tool in this tutorial and therefore we will be using the clone stamp tool to blend the facial skin color above the eye. NOTE:uneye the original image. We'll continue to work on the layer we just duplicated. Step 7: The Clone Stamp is a tool not all graphics artist use because it has almost the same effect with the spot healing brush tool. To use the Clone Stamp tool, Press dow your Alt key and click on a spot on the face to identify the skin color then gently apply on the eye. NOTE:You have to be very careful when selecting a spot to be used. You can repeat clone stamp identification until you get the perfect color for your blend. The whole eye will be covered with the facial color. Then, the left eye. If you are not concentrating well on the tutorial, scroll up to careful read the steps and procedures till we get to this point. Our main aim of using the Clone stamp is to blend the skin color over the eye of the lady. Step 8:Visualise the original image and uneye the the layer we just used clone stamp on. Select a reactangular marque tool on the tool box and gently drag a rectangular box on the eye. Then, press Ctrl + J to cut out the marque on the next layer. Step 9:The newly cropped right eye layer is to be moved above all layers so as to visualise it on the eye-blended layer. Step 10:Click on the layer that has the croopped eye. Use the polygon lasso tool to trace out the hair of the eye-lid. This is because in our animation the hair been traced out of the image will be used to help make a realistic losed eye in our animation. After uing the Lasso tool to trace out the hair. After tracing the upper hair in the eye, press Ctrl + J to duplicate the selection in a new layer. NOTE: uneye the right eye layer to view the new hair of eye-lid layer. Step 11:We need to change the direction of the hair by flipping it vertically. To do that, click on the eye-lid layer Go to Edit, move to Transform then select Flip vertical. Step 12:Visualise the right eye layer to know the exact position your eye-lid should be placed. Press down arrow key repeatedly to place it correcly. NOTE:When doing this, some images needs the use of rotation to perfectly place them. To do that, press Ctrl + T to transform and then press R to rotate. drag the object to rotate to your best fit.

CARTOON GRAPHICS: HOW TO ANIMATE AN IMAGE USING PHOTOSHOP

- 1 comment
CARTOON GRAPHICS: HOW TO ANIMATE AN IMAGE USING PHOTOSHOP: An image animation in Photoshop CS6 or lower versions takes patience and professionalism. But, this post contains logical procedures with...

You Must Be Anxious About How Exactly You Would Be Able To Design An Artwork Or Cartoon By Yourself.

- 1 comment

Introducing you to the CORELDRAW WORKSPACE is very important. For readers who are new to CORELDRAW Environment. The projects you create in CorelDraw are called Drawings. In this post, you will use the tools provided by CorelDraw to create a simple drawing. You will learn to use the following tools in designing your own cartoon graphics. 1. Tool bar 2. Tool box 3. Property bar 4. Fly-outs 5. Docker windows and palettes 6. Mouse commands 7. Help You will also learn how to create a workspace with customized toolbars. The toolbar displays by default and contains buttons that are short-cuts to many of the menu commands. In the following procedures, you will use the toolbar to start a new drawing. 1. On the toolbar, click the NEW button to start a new drawing. By default, this creates a drawing page with a width of 8.5 inches and a height of 11 inches. 2. From the ZOOM LEVELS list box, choose to height. This fits the height of the drawing page inside the drawing window. By the left side of the CorelDraw environment is the TOOL BOX, the free hand tools serves a major role in the cartoon designing. You can click on the dark arrow of the freehand tool to use other fly-out tools which aids making wire frame more realistic, POLYLINE TOOL is a good example. which is used as an alternative to free hand tool. There are still other tools that does the same functions with the two mentioned tools but I recommend this two as the best for wire framing. When using POLYLINE tools make sure the starting edge always meet your end point that makes the wire frame fillable. When the Polyline mapping isn't touching the edge, it will affect it from filling a solid or transparent color in it. A polyline mapping shouldn't end like this. USING MY BEST ACTRESS PICTURE AS AN EXAMPLE MERCY AIGBE, that is the name of this pretty popular Nolly wood actress, am sure you must have seen her on your Nolly wood home video. This is a clean picture of MERCY AIGBE we intend to work on, huh? Let's assume MERCY as a client who sent you her image for Graphics Cartoon edition, she wanted you to cartoonize her so that she can use it for some adverts or soap opera. Staring at the image, cartoon graphics might look much difficult and can therefore convey fear into your mind. HOW CAN I DRAW THIS?¡® Calm down, Graphics is made much easier here even if you are not an artist. Do u remember that graphics step is just basically in 3 steps? Let¡®s approach this image using the Wire frame, you have to learn to be patient and steady not to make mistakes when tracing the images. Tracing of images with the wire frame might take much of your time and it includes the effect itself. To capture the main effect on the picture, you can dim your eye by closing one eye to look at the image, the dark, well-lit and shinning part of the image would rather look clear to you then you sketch with using the wire frame. Thus, you can make use of the poly-line tool or free hand tool to make a wire frame. But, I recommend poly line tool for easy capture of the image shows and effects. After sketching the image. NOTE: When you are drawing a wire frame of any shape, learn to make all fill able or solid-content. That is, make all wire frames drawn possible to fill-in color using a color palette by the right hand side. Not just sketches, ok?

GENESIS OF A GOOD CARTOON ARTIST

- No comments

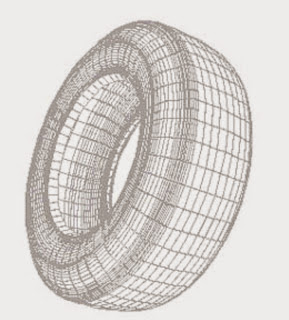
3 DIMENSIONAL GRAPHICS In every image whatever you intend to draw, there must be a sketch. This principle is also applied to that of the 3D Graphics artist too. Three-Dimensional Image, or 3-D image, flat image enhanced to impart the illusion of depth. Humans perceive the world and the objects in it in three dimensions¡ªbreadth, width, and depth. This seemingly simple phenomenon is the product of a complicated set of interactions between our eyes and our brains that is still not entirely understood. Our eyes are spaced about 6 cm (2.5 in) apart, which causes each eye to receive a slightly different image. The brain fuses these two images into a single 3-D image, enabling us to perceive depth. This way of seeing is called binocular vision, or stereoscopic vision. Flat images, such as illustrations, photographs, films, and graphics on a computer screen, can be manipulated with any of several techniques to create the illusion of depth. Such techniques make the objects in the images appear to pop out of the paper, film, or screen on which they appear. Once the realm of entertainment novelties, such as movies and comic books, 3-D images today have applications in medical technology, industrial design, and high-tech virtual training programs for surgeons, pilots, and astronauts. SIMPLE ILLUSTRATION OF HOW GRAPHICS IS PERFORMED They are basically just 3 steps to get this done without confusion, but you have to set your mind in achieving this, total concentration is very essential when designing pure graphics, let¡¯s make a Dunlop tire an example. The following are the steps involved 1 Wire Frame 2 Texture 3 Shading and reflection WIRE FRAME: The process of creating a realistic three-dimensional computer graphic is called rendering. First, the computer artist creates a wire frame model of the object¡ªin this case a rubber tire¡ªand specifies its size and orientation. In a wire frame, the surface of an object is represented as a series of polygons. Each point where lines meet on the surface of the object is called a vertex and is represented in the computer by its spatial coordinates. Since the straight edges of polygons do not create smooth surfaces, detailed models require an extremely large number of polygons to create an image that looks natural. TEXTURE: Next the computer artist adds layers of detail to the wire frame model, such as color and texture, to give it a more realistic appearance. Here, the artist has added color, tread pattern, lettering, and lines to suggest the tire¡¯s molded rubber rim. The computer calculates how each layer of detail should appear at every vertex on the surface of the model, and then applies the layer to the model's contours like wallpaper. SHADING AND REFLECTION: Finally, the artist specifies the source, direction, and intensity of the light shining on the object. The computer uses this data to calculate how each vertex on the surface of the object will be shaded and how the object¡¯s shadow will be cast in the background. The artist has also applied additional layers of texture to enhance the roughness of the tread and the smooth, reflective quality of the tire¡¯s inner surfaces. Don¡¯t get exhausted yet, you need to be focus to get things done this way, majority would continue asking how exactly we insert this effect to make such sunlight and every expression on the rubber wheels. You don¡¯t need to be an Artist just follow the basic steps. It takes little stress to design something like this once you know these basic steps.

CARTOON GRAPHICS0…3 Made Easy OnlineCARTOON GRAPHICS0…3

- No comments

CARTOON GRAPHICS0…3 WOW! This is amazing, You can convert your images to cartoons of your own effect free of charge. visit the following websites for your image conversion into cartoon graphics all in one click. www.cartoonize.net www.kusocartoon.com www.mywebface.websearch.com These websites are tested and trusted and they are very great. The only problem I discovered about these websites is the tag. Their tag is on every image designed by their software which makes it a little degrading, What do you think? uploading an image that refers to a weblink like an advert poster or handsbill is somehow embarrassing and humiliating. I will advice you not to upload a tagged image to your friends. Because, it won't upgrade you but degrade your level below the big boy or big girl's standard? But, there is a way out. I am a freelancer, i design cartoon graphics too. But, mind you THERE IS NO TAG attached to my designed cartoon and its more realistic than a programmed software image converter plus interrogational. you can

HOW TO DESIGN A COMIC LIKE CARTOON FROM A REAL IMAGE

- No comments

Comic Cartoon is an awesome way of making your photos unique and making fun out of them. In this post, we learn the basic steps on how to achieve the below result: Requirement: Photoshop CS4 or latest, Foto Sketcher software Level: Intermediate Result: Comic-like cartoon artwork  Foremost, try to download Foto Sketcher software. It serves an important role in sketchup of the image. Click hereto download the fotosketcher software. The Original image we are working on is the image of an ebony lady. Download the Original image for turorial purpose or try any image of your choice for this tutorial. Step 1: Open the Foto Sketcher application from the shortcut created on your desktop. Step2: Click on File, Open a picture....Select a picture from the source picture source then click Open. The below diagram should appear automatically. But, if it doesnt. Click drawing parameters noted as 1 in the diagram below. Select drawing style as Pen & ink sketch 2. Step3: Click on the draw as noted in the below picture. Step 4: The fotosketcher automatically sketchup your image into a comic-like sketch. NOTE: When loading, do not interrupt processing. Finally, the Sketch should look this way. Press Ctrl + S to save the sketch. We then, continue on photoshop CS4 for coloring and final rendering. Open your photoshop CS4 or any newer version. Step 5: Create a new page of 300 x 300 pixel with resolution of 300. you can choose something different. But, its best to follow this tutorial if you are just learning cartoonizing. Click on File, select Place and select the fotosketcher image from the source. Step6: There is so much space by the edges. Use the rectangular marque tool to form rectangles at edges to make the image look centered in the page. Make sure you are doing this on a seperate layer. Step 7: Click on the fotosketcher image layer, set blending mode to multiply as noted in the diagram. Step 8: The next is to give the image a skin color. Click on the set forground color (1), a color picker dialogue box is displayed, select only web color to make you pick from better ranges. We are using a brownish color because we are working on an ebony. If you are having difficulty selecting a color, untick the web color and select better from ranges.    Step 9: Use the brush tool to color the skin in the picture including the d face. NOTE: Do not paint the eye, the lips color is always different so make the lips an exception too. All this is to be done on a new layer. Step 10: Create new layers to paint the wears and the wrist watch she is putting on. I decided to use a red wear because red wears are always flashy and the best color to make a cartoon more attractive. there are so many colors that can make your cartoon more cool. designers discretion can be used to apply colors but you dont want a situation where the colors affects each other. NOTE: Apply colors wisely.  Step 11: Add lightening and reflections to your image to make it look more attractive. Select a white forground color, select the brush tool, reduce opacity to 12%, right click on the page to set master diameter ranging from 1px - 2500px. NOTE: the hardness must be in zero. Step 12: Apply refelections wisely...its better to always take a look at the image again when applying reflection so as apply correctly. NOTE: reflectons should be on another layer to enable ease blending of corrections and additions. Save your image. then, you should av a comic like cartoon. Result: The result should appear cool in jpeg format or any other graphical format of your choice. Thanks. If you have questions. Kindly send your message to Precious Graphics.

See Jamb Questi0n Oh, How Can Men Keep Their Wife In Marriage

- No comments

Mama iyabo funny die...but na d man waka go me problem him self o.

Ppl N0 Get M0ney Bt Them Dy Form D0pe M0ney

- No comments

Yoyoyo it to0 much m0ney, 4 their mind naaa.. I rep www.funnydpix.cf j0r

Pastor Dy Fear Mummy Water

- No comments

Even Pastor they fear mummy water, m0st past0r's we have tody are called becus of m0ney n0t God

Igbo Men And M0ney

- No comments

Igbo men be like m0ney is my father.mother even my life and family..

Wizkid Vs Davido

- No comments
See where wizkid and davido alm0st hit ground...

9ja Pastorz

- No comments

Contact www.funnydpix.cf owner for all type of graphic work @ cheap rate...

How To Create An Animated .GIF InPhotoshop CS5, CS6 & CC

- No comments

Let¡¯s say you have a folder full of images that you want to sequence together as frames in an animated GIF. You can find special programs online to do this, but with some of the new features of Adobe Photoshop, it¡¯s quite fast and simple. 1. Gather the images you want to animate into one folder. 2. Click File > Scripts > Load Files into Stack . When the ¡°Load Layers¡± window pops up, click Browse to select & open your image files, and then click OK . This should import the files you selected as individual layers in your document. Rearrange the layers into the correct order, if necessary. 3. This next step differs depending on what version of Photoshop you have: 1. For Photoshop CS5: Open the Animation palette ( Window > Animation). 2. For Photoshop CS6: Open the Timeline palette ( Window > Timeline ). 3. For Photoshop CC (Creative Cloud): Open the Timeline palette ( Window > Timeline ). In the middle of the palette, you will see a button with a drop-down allowing you to choose either ¡°Create Video Timeline¡± or ¡°Create Frame Animation.¡± You want to choose & then click the Create Frame Animation button. 4. In the Animation/Timeline palette menu (found under this button at the top right corner of the palette: ), click Make Frames From Layers . You can also click Reverse Frames if needed. This will take each layer in your document and set it as an individual frame in the animation. 5. Now we will change the duration of each frame. Make sure you are in frame view, not timeline view. If you do not see thumbnail icons of all your layers in the Animation/Timeline palette, click the icon in the lower right corner (the hover text will say ¡°Convert to Frame Animation¡±). Now, back in the Animation/Timeline palette menu, click Select All Frames. 6. Click the drop down button just underneath each frame image (circled in red in the image below). This will bring up a menu where you can set a duration. Since all frames are selected, all frames will be set to the same time. Each frame can be changed individually, if desired. 7. The drop down button circled in black in the image above will change how many times the animation will loop; either a fixed number of times, or forever. 8. Once the frame order and timing as been set up, it is time to save the image! Click File > Save for Web & Devices , make sure the file format is set to GIF, change any other options if needed, and save the image! You will now have an animated GIF taken from a folder full of the individual frames. In fact, as long as each frame exists as a separate layer in Photoshop, the Animation/Timeline palette can be used to create the GIF. But, with CS5, CS6, or Creative Cloud (CC) it is easy to make separate layers from a folder of the individual frames as described. I rep www.funnydpix.cf

How To Create Text On A Curve InCorelDRAW

- No comments

CorelDRAW makes it very easy to create text on a path or text that follows the outline of any shape. Difficulty: Average Time Required: 2 minutes Here's How: Tips: More From Graphics Software More From About .com ƒ8°9 TOP 0„82013 About.com. All rights reserved. Switch to Desktop Site Menu Graphics Software 1. Draw a line or shape with any of the drawing tools. 2. Select the Text tool. (Shortcut F8) 3. Hold the cursor over the edge of the shape or line, but just above the outline. The cursor will change into an I-beam next to an 'A' on a curve. 4. Click once and a blinking cursor attaches itself to the line or outline of the shape. 5. Start typing and the text will flow along the path. 6. After entering your text, switch to the pick tool and Ctrl-click on the type. From the property bar you can change the text orientation, placement, distance from path, and offset. 7. For readable text on a circle where one part isn't upside down, make two type objects attached to the shape: one for the top half and one for the bottom half. 8. Place one of the text objects on the other side of the path, and adjust the distance and offset to correspond with the other side. 1. The last button on the property bar allows you to put the text on the other side of the path. 2. The line or shape used as a path for the text can be hidden by setting the line and fill properties to none. 3. When text is attached to a shape you will need to Ctrl-click to select one or the other if you want to change line and fill properties independently

On My Way To 2015 Like A Boss

- No comments

We Have to thank God 4 making us see the end of the year 2014...rep www.funnydpix.cf